Create a New Partition on a Windows 7 Hard Disk


Here’s an easy way to create a new partition on your disk.
  1. Open the Disk Management console by typing diskmgmt.msc at an elevated command prompt.

    partition1.jpg
  2. In Disk Management’s Graphical view, right-click an unallocated or free area, and then click New Simple Volume. This starts the New Simple Volume Wizard.

    partition2.jpg
  3. Read the Welcome page and then click Next. 
  4. The Specify Volume Size page specifies the minimum and maximum size for the volume in megabytes and lets you size the volume within these limits. Size the partition in megabytes using the Simple Volume Size field and then click Next.

    partition4.jpg
  5. On the Assign Drive Letter Or Path page, specify whether you want to assign a drive letter or path and then click Next. The available options are as follows:

    partition5.jpg

    Assign The Following Drive Letter Select an available drive letter in the selection list provided. By default, Windows 7 selects the lowest available drive letter and excludes reserved drive letters as well as those assigned to local disks or network drives.
    Mount In The Following Empty NTFS Folder Choose this option to mount the partition in an empty NTFS folder. You must then type the path to an existing folder or click Browse to search for or create a folder to use.
    Do Not Assign A Drive Letter Or Drive Path Choose this option if you want to create the partition without assigning a drive letter or path. Later, if you want the partition to be available for storage, you can assign a drive letter or path at that time. 
  6. Use the Format Partition page to determine whether and how the volume should be formatted. If you want to format the volume, choose Format This Volume With The Following Settings, and then configure the following options:

    partition6.jpg

    File System Sets the file system type as FAT, FAT32, or NTFS. NTFS is selected by default in most cases. If you create a file system as FAT or FAT32, you can later convert it to NTFS by using the Convert utility. You can’t, however, convert NTFS partitions to FAT or FAT32.
    Allocation Unit Size Sets the cluster size for the file system. This is the basic unit in which disk space is allocated. The default allocation unit size is based on the size of the volume and, by default, is set dynamically prior to formatting. To override this feature, you can set the allocation unit size to a specific value. If you use many small files, you might want to use a smaller cluster size, such as 512 or 1,024 bytes. With these settings, small files use less disk space.
    Volume Label Sets a text label for the partition. This label is the partition’s volume name and by default is set to New Volume. You can change the volume label at any time by right-clicking the volume in Windows Explorer, choosing Properties, and typing a new value in the Label field provided on the General tab.
    Perform A Quick Format Tells Windows 7 to format without checking the partition for errors. With large partitions, this option can save you a few minutes. However, it’s usually better to check for errors, which enables Disk Management to mark bad sectors on the disk and lock them out.
    Enable File And Folder Compression Turns on compression for the disk. Built-in compression is available only for NTFS. Under NTFS, compression is transparent to users and compressed files can be accessed just like regular files. If you select this option, files and directories on this drive are compressed automatically. 
  7. Click Next, confirm your options, and then click Finish.

    partition7.jpg
The Windows 7 Disk Management tool will now show the space configured as a new partition.


partition8.jpg

How to run Turbo C++ in Windows 7 in full Screen


  • Create a new folder in your C:  and rename it to ‘turbo’ [or anyone you feel like]. Reason for doing it will be mentioned as you read.


  • Now, run the installed setup file [TC3setup.exe] and give the extraction position as


  • Now, download the DosBox setup from here
  • Install DosBox in your system.
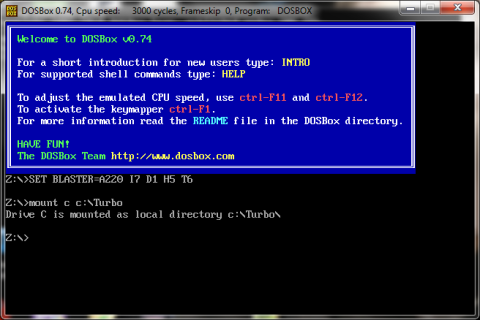
  • Now run DosBox. A command prompt type window will appear. Now note that there is a difference between the command prompt our system is equipped with and this version of command prompt. This emulator is 32-bit in contrary to native 16-bit prompt, therefore, allowing you to run it in full screen mode.
  • In this window, we now need to mount the folder via this command:   
This tells about the reason behind creating another directory while extracting TC3setup.exe. Mounting works relative to a folder, here Turbo.
  • Work is almost done. Now, type “C:” to mount above mounted drive.


  • To list the content of this mounted space, type ‘dir’


Type
>cd tc
>cd bin


to reach within subdirectories for tc.exe
Now type tc and press Enter.
Press Alt + Enter to go in Full Screen Mode.


This task may look all so tedious. But, everything can be automated in a single go.
Once you have successfully managed to run it in full screen mode, you can easily automate the process by editing configuration file. You can drop comments below in case of any problem to get through.

To run TC automatically on running DosBox:
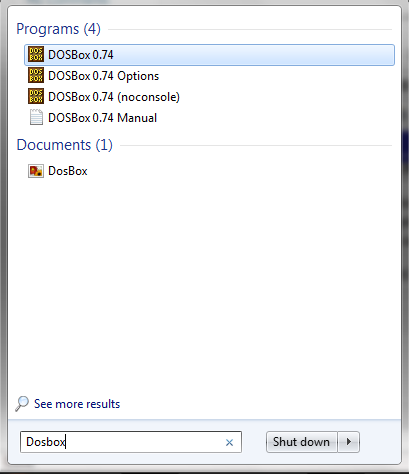
Search for “DosBox” in start menu.


  • Nowclick onDosBox 0.74 Options

A configuration file in Notepad will be opened.
Go till the end of the document and add following lines there:
mount c c:\turbo

c:
cd tc/bin
tc

Save this file and exit from notepad.
Run DosBox again. Voilla! It will take you straight to TuboC++.


MS Office 2013 Download Full With Crack ...

Heyy Friends!!
            Enjoy 2013...with MS Office 2013..
Download the Latest Version Of MS Office 2013 Full With Crack....
Enjoy My Friends....


Software Name:
Microsoft Office
Software Version:
2013 (365)
Supported Systems:
Windows 7 and 8 (x86_x64)
License Type:
Full Version
Category:
Office Software
Size:
700 MB
Activation Key/Crack/Patch:
Office 2013 Serial Key
    

                                             Download Office 2013
                                  Download Key
                                              

How to Hack Facebook account............


First we will talk about requirement.
The one and only requirement is a site. You must create a site to host(upload) the phishing files. You may create a FREE Site here: http://www.5gbfree.com/. Its free and easy. We found this site after searching a lot on internet.
Download Phishing Files: Click Here
Instructions:

  • Download phishing files
  • Extract it using winrar.
  • You will find four files and one folder under that rar file.
  • Upload all files and folder to your created site[For example, if you site is www.example.com, then create a folder with name "Facebook", then upload your files in "Facebook" folder].
  • Prepare phishing URL[Making phishing url, if you have uploaded all files to "facebook" folder, then your URL should look like this, www.example.com/facebook/index.htm].
  • Dont rename any file!
  • Everything is ready now.
  • Send a mail to victim(person that you want to hack) with phishing URL. Write any message you want, like click here to see your gift, etc.
  • Its recommended to hyperlink a text with that link, like write "Click here" and then hyperlink it to phishing URL. There are option of hyperlink in every mailing client/site. You may also short the URL using http://www.goo. to make it more perfect. Send Mail!

Now, you have to wait for some time. When the victim will enter his/her ID and Password, it will get recorded in a text file that you have uploaded named "passes.txt". Check this file at regular interval and if you find password, then the account is HACKED.

**********************************************************************************************************************
In phishing, there is a 50-50 chance. If the victim know about phishing, he/she will not enter his/her password and phishing attack will fail. So, there is no guarantee. Do it on your own risk.

Video on how it works:


Posted by SOMNATH BAKSI
INDIAN HACKER